Posts

Showing posts from October, 2011

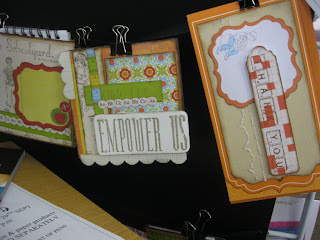
Measurements for Teachers Gift

I have had a request for the measurements for these projects so here they are.... hope this makes sense for you. Mini Canvas Magnet (it's a 4inch x 4inch canvas) you will need patterned papers as follows: One 10cm x 10cm One 4cm x 10cm One 6cm x 6.5cm One 2cm x 6.5cm One 1.75 x 7cm Diecuts and Stamped Titles File Folder Covers: Two pieces of chipboard covered in brown paper 16cm x 10.75cm Folder pages: Six pieces of yellow cardstock 14.5cm x 10cm Concertina sides to file: One piece of Blue cardstock 16cm x 17cm (fold fan fold back and forth at 1cm intervals) chop this in half to give you two pieces that are 8cm x 17cm. (one for each side) Bottom of Folder: One piece of blue cardstock 13cm x 16.5cm Cover decorations: Once piece of patterned paper 6cm x 10cm. and Once piece of patterned paper 16cm x 7.5 or two smaller pieces as we used (yellow blue and green ruler patterned paper) Two diecuts. Thank You Card : One card and envelope set (available at arnolds) One

"Mothers Inspired the Soul" Canvas Class at Arnolds Scrapbooking

Image
We ran this class twice as it was so popular so I haven't been able to put the instructions up until we had finished both classes. Today I had a real newbie scrapper who did this class and she did a great job of this, so it's suitable for all levels of scrapper from newbie to advanced. I've used the gorgeous Melissa Francis papers but you could adapt this layout to use any two papers from the same range. This canvas is a 10 x 15cm canvas that has been painted using a sponge roller and a pearlescent pink paint by monte marte. I used papers by Melissa Francis to create this layout. I have distressed the edge of my papers and then inked them but feel free to leave this step out if you don’t like a distressed effect to your page. (A small sponge is included in your kit for this purpose).   Distress and ink the edges of the 19 x 23.5cm patterned paper. Using a scalpel cut the points of the bunting flags to allow your photo to poke slightly under the cut out pieces. Using

Teachers Empower Us Gift Set

Image
Here is the class I taught today at Arnolds Scrapbooking store.  I had a small class of really lovely ladies to teach today and hopefully I did a good job. Marlene may try to make one of these mini concertina file folders again (fingers crossed I haven't turned her off them for life). I enjoyed teaching this class as all the ladies were warm friendly people which really helps when you're teaching a class. I used to teach people to drive and we held classes on various related topics like maintenance etc, then before that I taught people to sail but this is by far my favourite teaching post! I sanded the edges of all the elements and used a dauber to sponge ink (Tim Holz Distress Ink Walnut) onto the edges of all the elements to give a more aged appearance . It is up to you if you’d also like to ink the edges or if you would like to leave your items uninked.   Thank You Card 1.   Ink all the edges of your elements. 2.   Sew the straight line and the scalloped edge pre-

Inspirational Quote Canvases Class

Image
This is the class I taught this Saturday at Arnolds' Scrapbooking Store called "Inspirational Quote Canvases" . You'll find photos of each canvas and the instructions on how to re-create the project yourself listed below.   I had a lovely group of ladies for this class which made it really easy to teach! LOL Materials: 4 mini canvases (4inch x 4inch) 1 piece patterned paper half a packet of Kaisercraft Blooms in coconut 1 bunch of orange blooms 12 inches of ric rac 1 gold heart charm (come in pack of 10 for $2) 1 set of angel wings 1 Kaisercraft craftwood picket fence Embroidery Thread or Floss Tools: Scissors Glue (really strong PVA or Pritt are both good) Pencil Tim Holz Distress Ink Walnut Butterfly Stamp or Butterfly Die Cut Instructions: Before you begin working on any canvas in particular you can grunge up your flowers a little more if you’d like, using either a dauber or the sponge piece and a brown ink (I used Tim Holz Distress Ink Walnut Stain). Ne

Free E-Book: 101 Easy Scrapbooking Tips for Beginners

Image
Hi Everyone, I have created this book (Valued at $27) which I hope will be a guide for beginners on the what where and how of scrapbooking. All you need to do to receive a free copy of the book is to subscribe to my scrapbooking club. Subscription to the club is of course FREE! What more would you expect from the scrapmiser? LOL Hope you like it! ciao scrapmiser

How To Make Tissue Paper Flowers

Image

MYO Flowers

I love using flowers on my layouts!  They're so pretty and add some beauty and softness to my pages.... but I don't luv the prices of some flowers. Like the prima range with the lace and pearl centres. Aren't they gorgeous? But I just can't pay $7.95 for three flowers. So recently I was looking through You Tube and watching some of the fabulous videos available on making flowers.  There are so many different ways to make flowers, each giving a unique look and no matter what your skill level you'll find a flower you can make.   But while I was looking I realised that there isn't a video on a flower I make. So I'll be uploading a video of this soon. My flowers are very cheap! (Were you expecting anything less from me? LOL). I make them out of tissue paper and can get at least 45 flowers out of one packet of tissue paper. So keep an eye out for this upcoming video.